Today’s blog is by crafting designer and gift wrap expert Gina Tepper. Gina’s designs have appeared on ABC, NBC & FOX affiliates in Washington DC. She has also served as a judge for Scotch Brand’s Most Gifted Wrapper Contest. Please visit Gina’s blog www.ginatepper.com.
Now, here’s Gina…
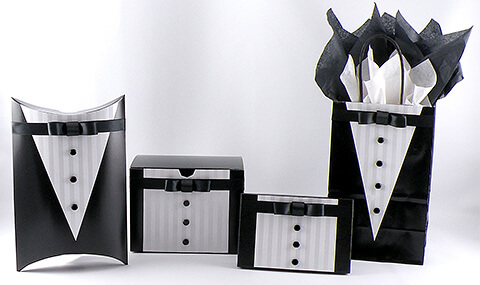
I have always loved themed gift wrap — it is an unexpected way to decorate a gift and it just makes people smile. I was walking by a tuxedo rental store at the mall and saw all of the different styles of tuxes shown on the wall. I was inspired to create a gift box design perfect for a groom or groomsmen using a tuxedo as the presentation.
It is easy to create this look and it will work with Nashville Wraps large selection of black boxes. The Pearl Stripe Gift Wrap looks like an expensive tuxedo shirt and the Double Faced Satin Ribbon gives the bow tie a crisp and classic style. I finished the design with black shiny beads to simulate buttons. I have created the Black Tie gift design so any of these styles shown can be reused after the gift is opened — this also allows for the gift wrapping to be in done in advance. They will dazzle any wedding party or add sophistication to a black tie event.
Materials Used
- Pearl Stripe Gift Wrap
- 5/8” Black Double Faced Satin Ribbon
- Round Black Beads (found at your local craft store)
- Craft Glue
- Glue Stick
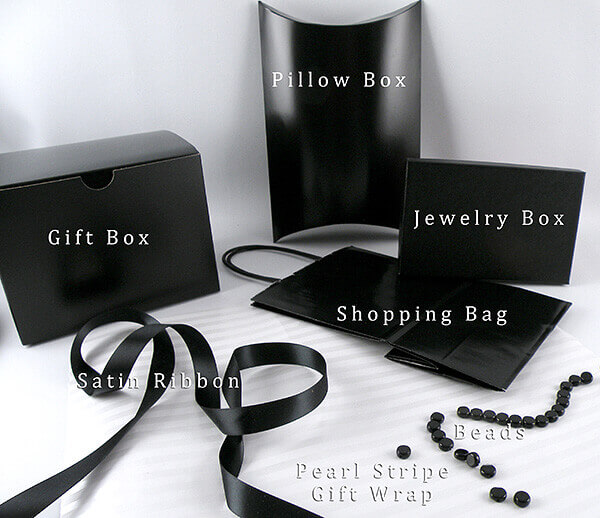
- Black Jewelry Boxes
- Black Gloss Gift Boxes
- Black Gloss Shopping Bags
- Black Paper Pillow Boxes
- Black Tissue Paper
- White Tissue Paper
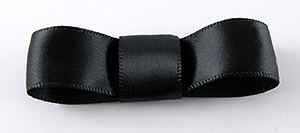
How to Create a Bow Tie
This bow tie design will work on any size of the Nashville Wraps black boxes, gift bags or pillow boxes for the Black Tie design.
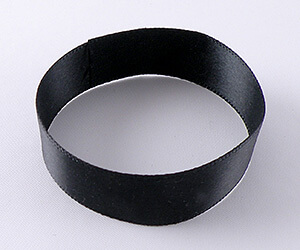
1. Cut a 6-inch piece of black satin ribbon. Fold the ends to middle, overlapping about 1/4 inch, and glue to form a loop.
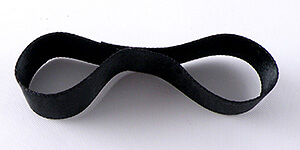
2. Apply glue to the inside center and press together to form two loops.
 3. Cut a 2-1/4 inch piece of ribbon and place the right side of the double loop bow face down on to the piece of ribbon.
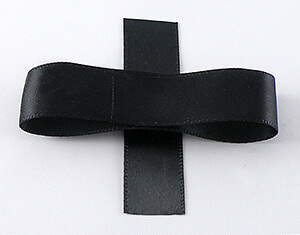
4. Apply glue to each end of the ribbon piece and fold over to form a bow.
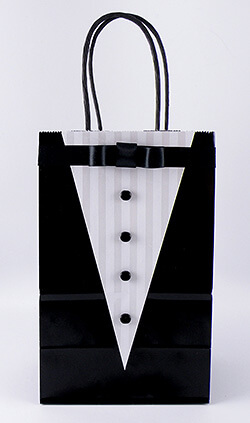
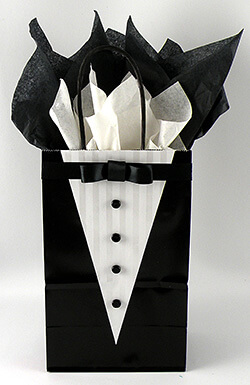
Gift Bag Design
This Black Tie gift bag is a very elegant design — the layered tissue paper adds height to the presentation that makes it look extra fancy.
-
- Cut a piece of the Pearl Stripe Gift Wrap 1 inch smaller than the length and the 1 inch smaller than width of the front of the gift bag.
- On the wrong side of the wrapping paper, mark the center of one of the short edges and draw a line from each of the corners on the opposite short end to the center mark to form a triangle. Cut along the lines.
- Apply glue to the wrong side of the wrapping paper especially around the edges. Attach the paper to the front of the gift bag, lining up the edges of the paper with the top edge of the bag.
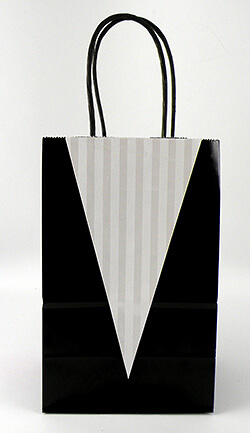
4. Cut a piece of the black satin ribbon the entire width of the front of the gift bag. Glue the ribbon to the front of the gift bag 1 inch from the top. Add small amounts of glue to the cut edges of each side of the ribbon to prevent fraying.
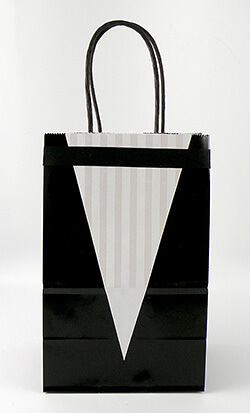
5. Glue the bow onto the center of the black satin ribbon on the top of the bag and attach the 4 black buttons, evenly spaced, on middle of the bag directly centered under the bow.
6. Fill the bag with layered black and white tissue paper to finish the design.
You can download detailed instructions including how to make the boxes and pillow box here.
More of Gina’s gift wrapping blogs:
Wedding Dress Gift Wrap Designs
Adorable Easter Chicks Gift Wrapping Ideas
Watch a how-to video below to see another similar idea!
I love this idea for a center piece black and white family reunion banquet.
There’s really a lot you can do with ribbons. This can also be a good way to start a business. It’s a great idea to incorporate the ribbon on tuxedo gift bags and boxes.