

How to Make Professional-Looking Gift Bows
By Kathy Green, Nashville Wraps Packaging Consultant

First, let’s make a big loopy bow. These are best done with ribbon that is not too soft. Our wired ribbons are great for this as well as the Simply Sheer Organza Ribbon and other ribbons with the monofilament wire in the edges. I am using our Wired Satin Stripe Sheer Edge Ribbon. It has a light wire and a satin center and is 1 ½ inches wide.
You will need about 4 yards of ribbon for the bow and another piece long enough to fit around your gift package and tie a simple knot. You will also need to have a 4 inch piece of florist wire or a metal twist tie. If you use florist wire, cut it before you start to tie your bow and keep it where you can reach it.
Begin by tying the ribbon piece around your gift wrapped box.
Before you start your bow here is a little tip to keep from wasting ribbon: don’t cut the ribbon off the spool till you are done. See how I started my bow near the ribbon spool and work out toward the end of my ribbon. Working from this end of the ribbon keeps it from twisting up as I work. I rolled off about four yards and started at that point.
Start by making a loop about 3 inches long. Squeeze the ribbon together like in the picture and hold with your thumb and forefinger. Now make a tight twist, turning the tail of the ribbon one half turn. Make another loop opposite the first, your bow should look like the one in the following video.
Now make a third loop on top of the first one. Again squeeze, twist then make a forth loop on top of your second. Continue making loops on top of each other, squeezing and twisting till you have six loops on each side of your bow. Remember, it will not look like a round bow till we are totally done making loops.
Still holding the ribbon between your thumb and forefinger, use the florist wire or metal twist tie to secure the middle tightly. I used one of our pink metal twist ties because it matches my ribbon.
Now pull two of the loops on one side away from each other as in the illustration A, continue till all loops are pulled apart on that side. Now do the other side. See how pretty your bow is already?
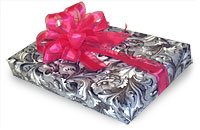
Now all you need to do is clip the ends of your twist tie and attach it to your gift package by placing it in the center of the knot you previously tied and tying the knot tails up and over your bow. Fluff out the loops and you have a beautiful gift wrap.
This size bow will fit nicely on our AB3 shirt box. You can adjust the amount of ribbon and loop sizes to make larger or smaller loopy bows.
How to Make a Beautiful Bow


We can add pizzazz by layering the loopy bow with a contrasting color or a ribbon of a different texture.
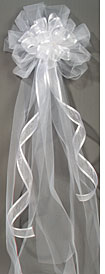
To make a layered bow, choose your ribbon, I used a narrow Simply Sheer Organza Ribbon in black to coordinate with my gift wrap. Now repeat the steps above for a loopy bow. I made eight loops on each side of my bow because this ribbon is not as wide as my original ribbon. Attach this new bow to the center of your original bow with either wire or twist tie or you can lay it in place and tie both bows together with the tails from your package knot. This bow method makes a pretty pew bow too; just make the tails longer for drama. We made our pew bow with 6 inch Tulle and Wired Satin Edge Sheer Ribbon for the center layer.


